Assistive Technology
Anvika's Engineering Portfolio
View the Project on GitHub anvikav/AnvikaEngineeringPortfolio
The Assistive Smart Jacket: Technology of The Future
| Engineer | School | Area of Interest | Grade |
|---|---|---|---|
| Anvika V | Princeton Day School | Computer Engineering | Incoming Senior |
Hello! My name is Anvika and I am a rising high school senior interested in computer engineering! This summer I developed an assistive smart jacket to help the visually impaired community.
My journey with assistive technology started by developing an object detection system that offers users sensory feedback about their surroundings. I have since turned that project into a jacket that discretely aids the user navigate a room.
There are countless ways to expand on my work and if you find yourself exploring them, reach out to me at anvikavasireddy@gmail.com!
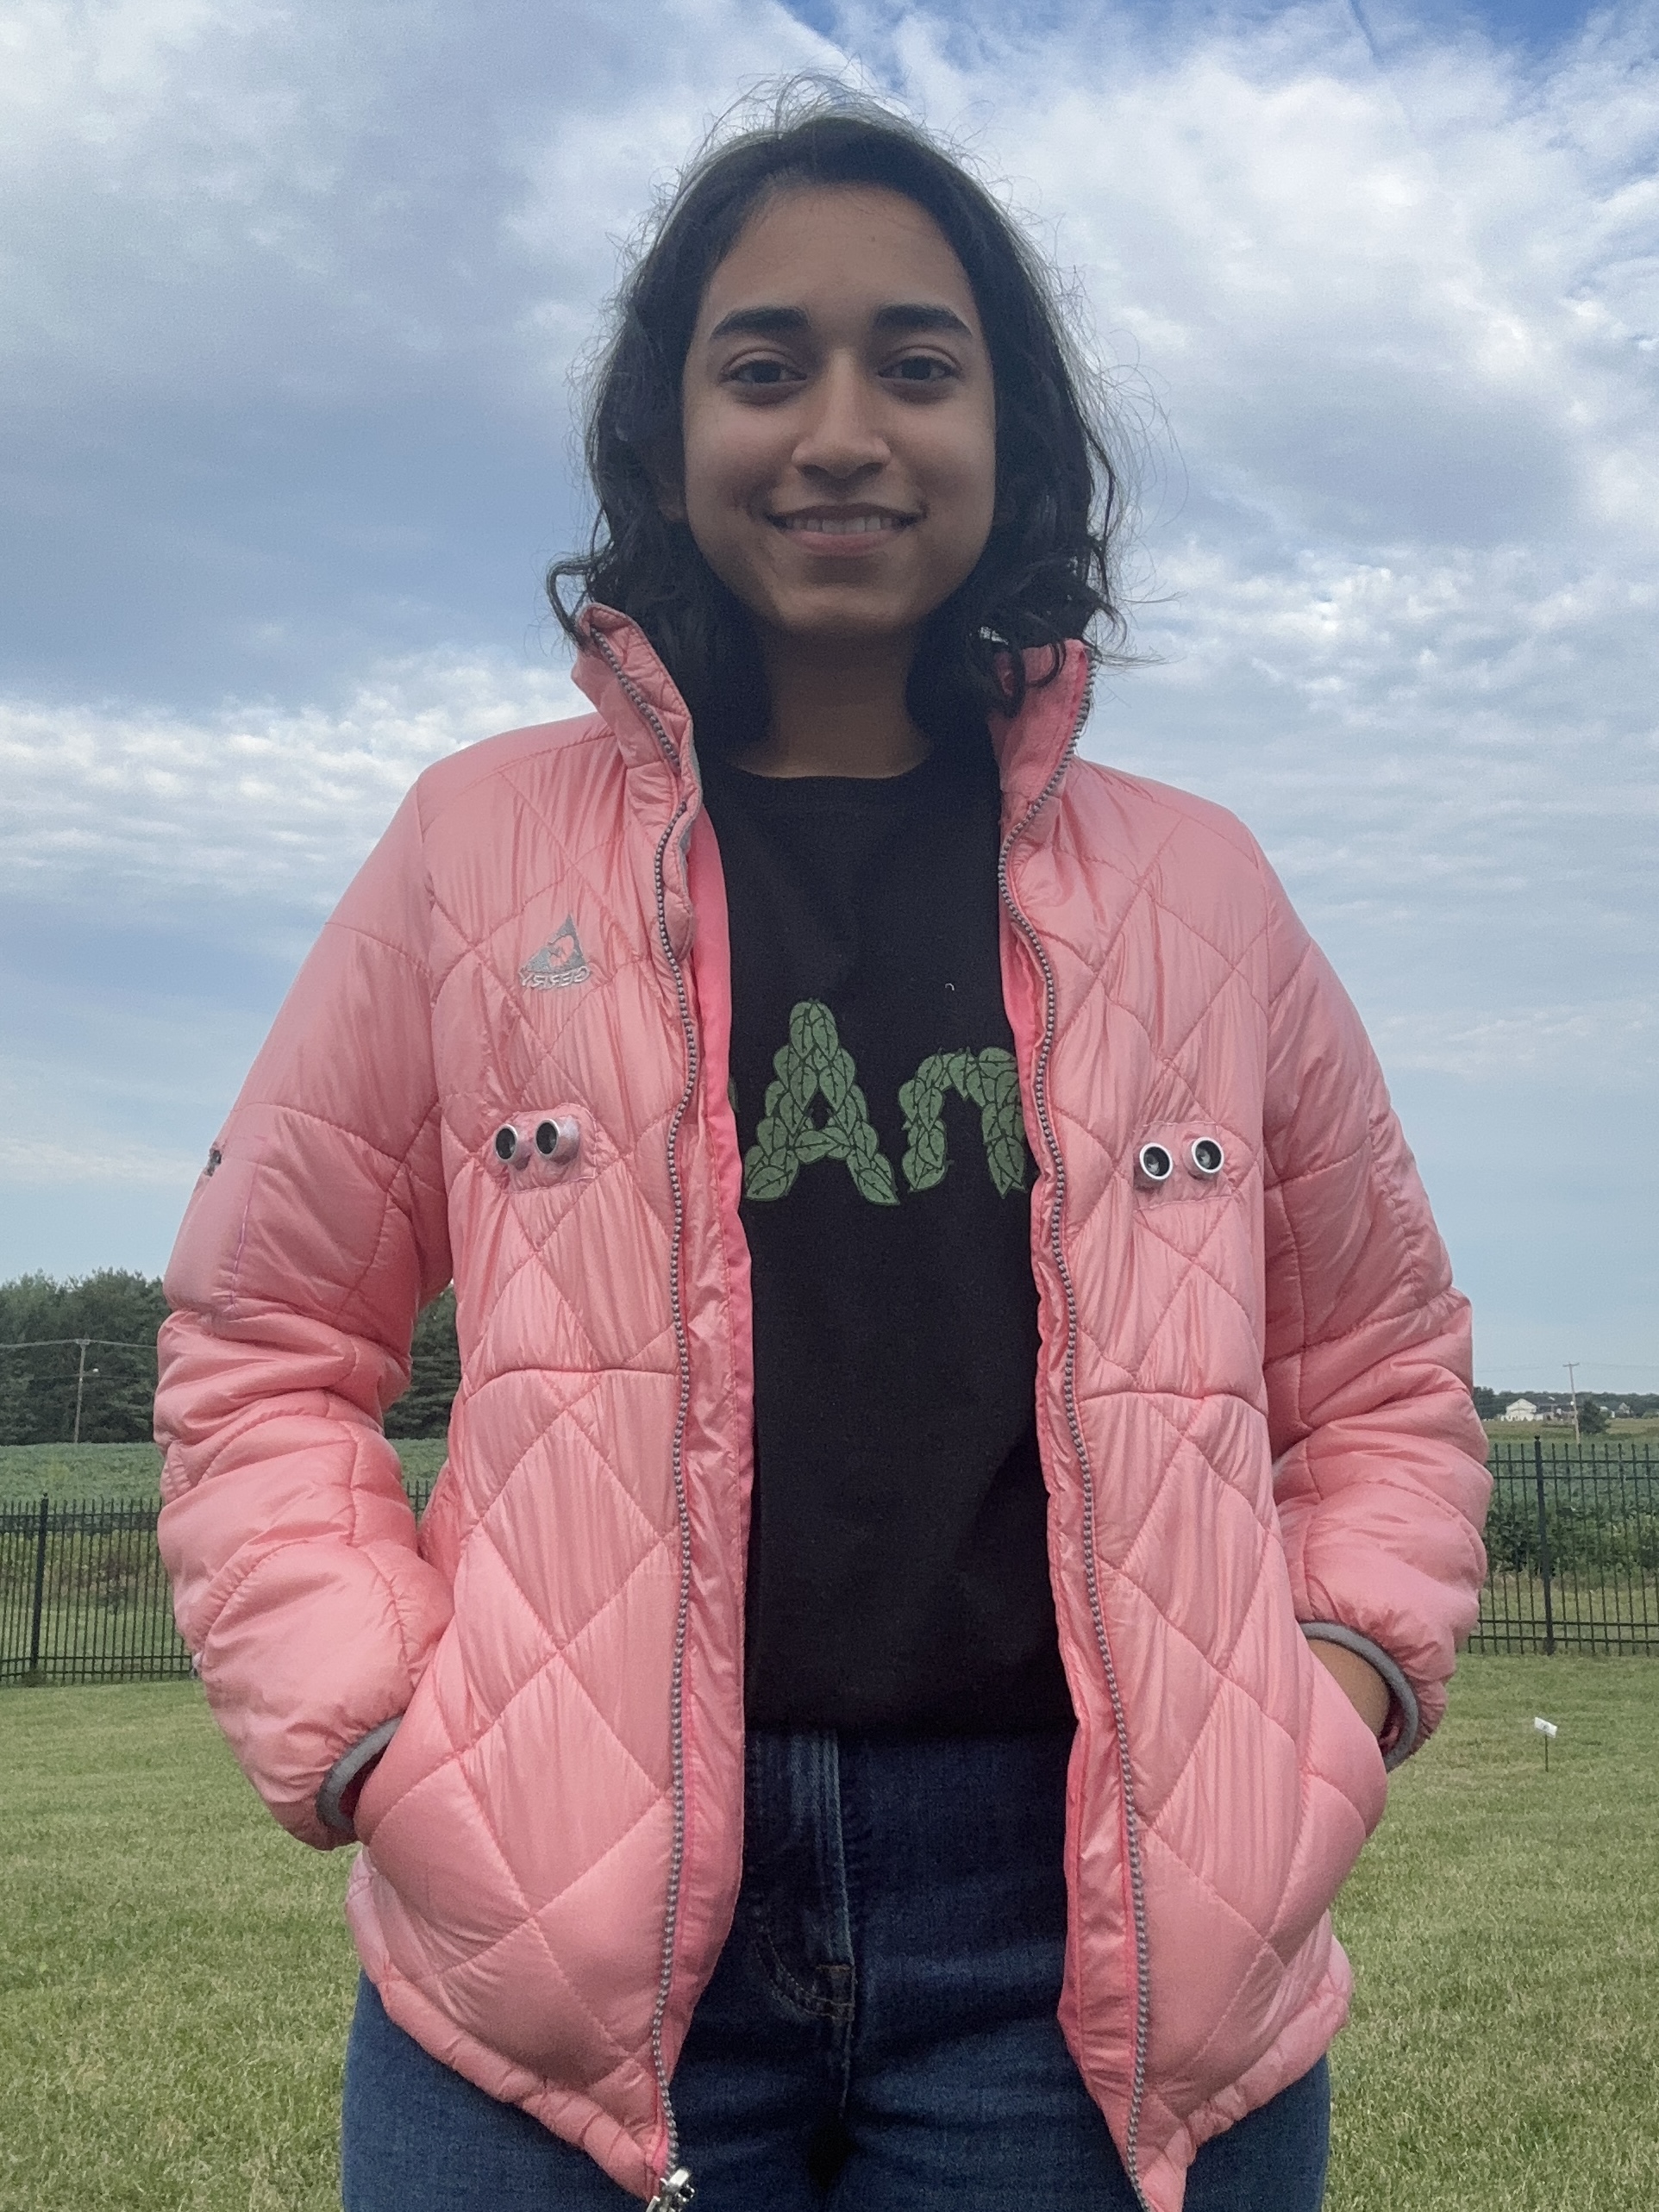
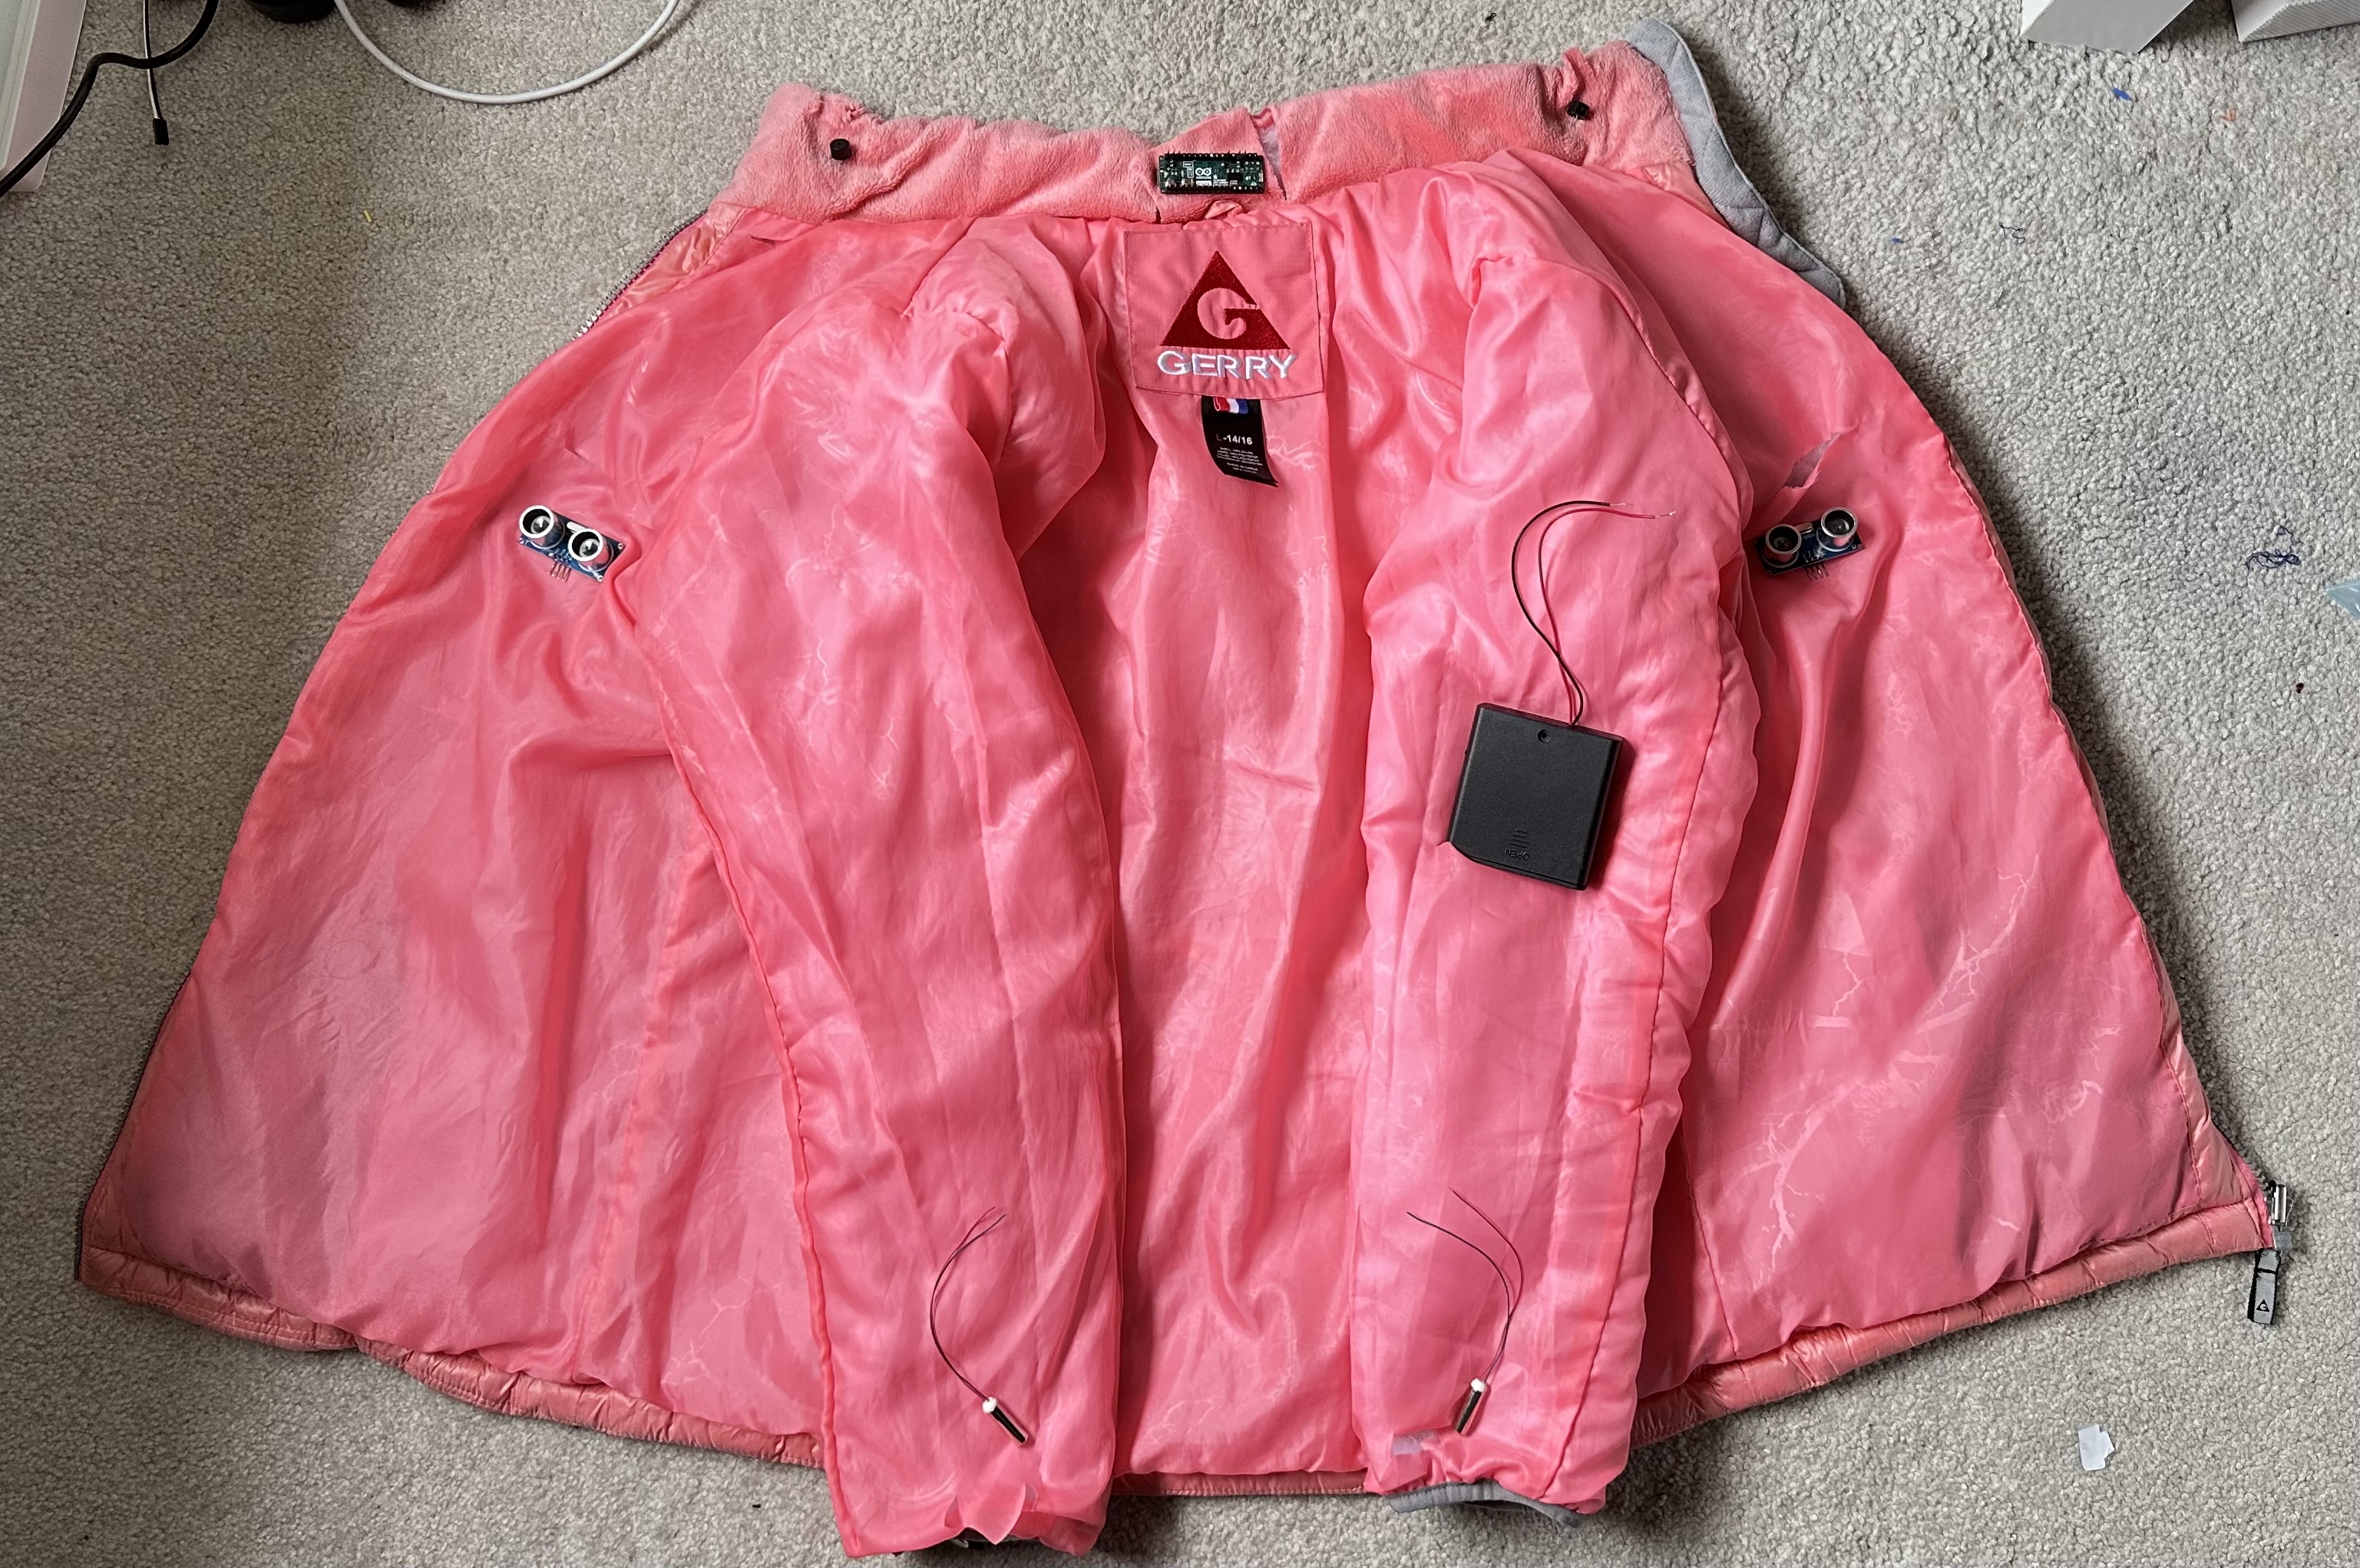
Anvika V. 2023 Smart Jacket [Photograph].
Object Detection
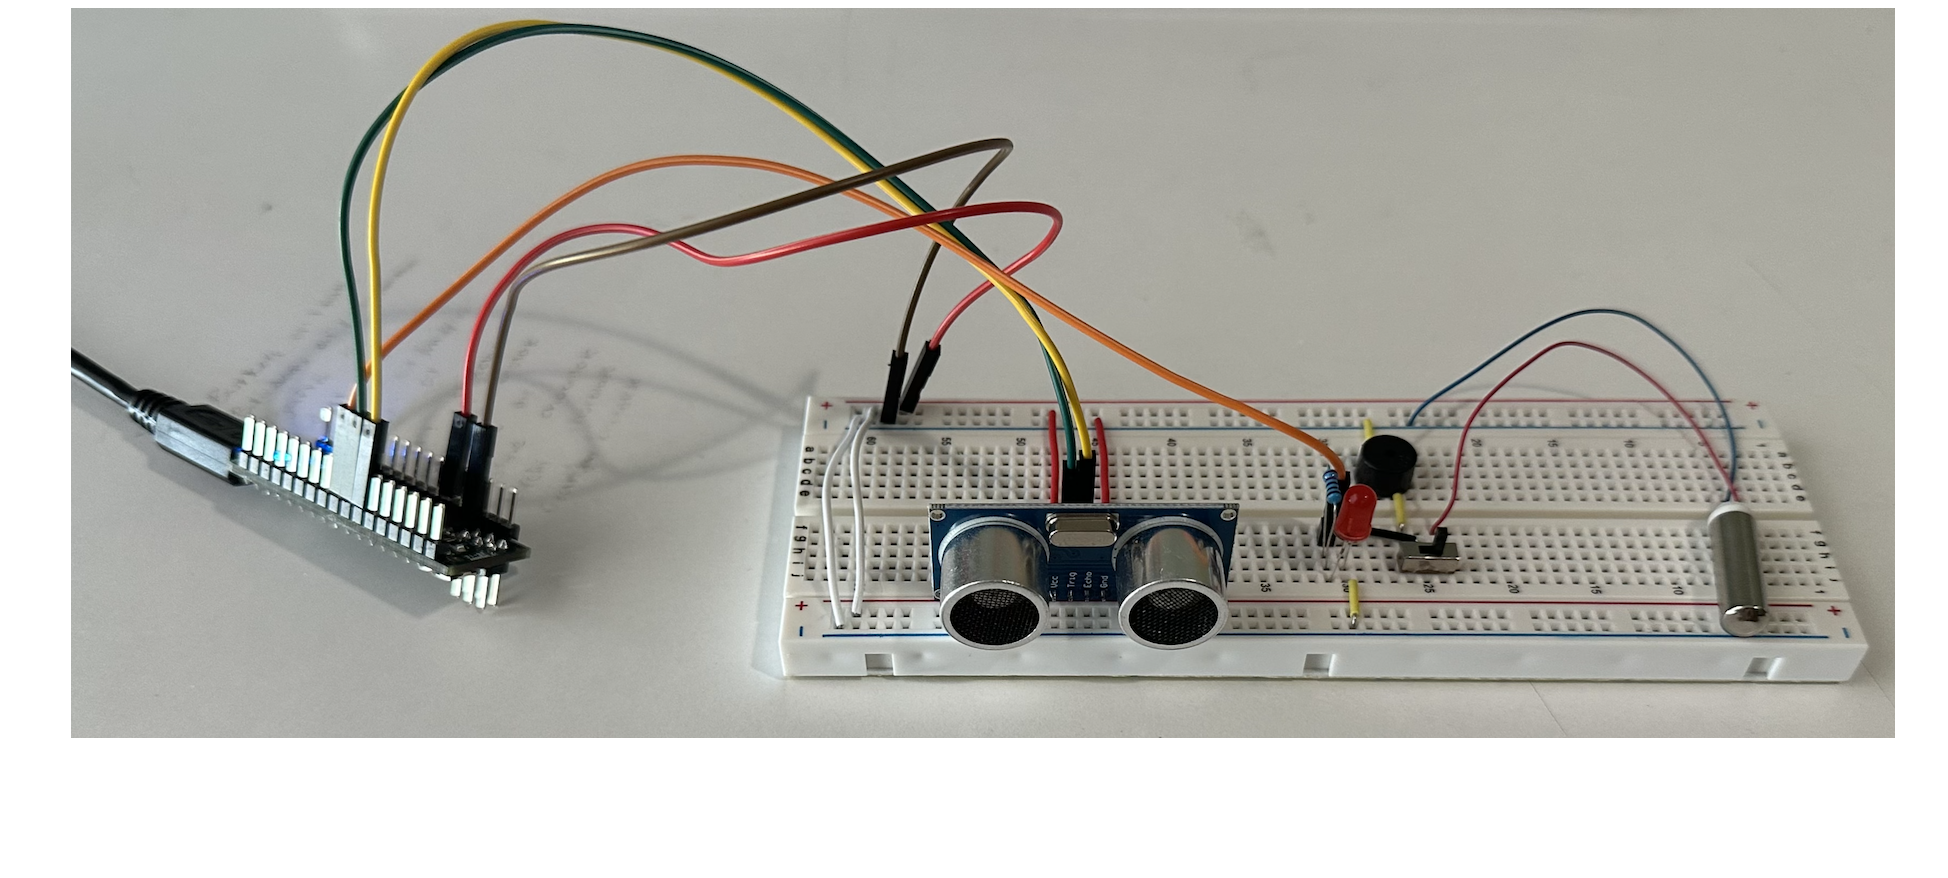
Anvika V. 2023 Object Detection Breadboard [Photograph].
The first step of this project was to develop a system that assists visually-impaired individuals navigate space by alerting the user of objects within a 70cm radius with either haptic or auditive feedback. As the object gets closer to the user, the system responds with more frequent vibrating or buzzing; a toggle switch is used to change between the two types of sensory feedback. Additionally, to establish a visual debugging method, the circuit has a 5mm red LED that lights up harmoniously with the sensors. Next, I will expand this by integrating a Raspberry Pi to translate text into Morse code and attaching it to a jacket to make it wearable.
Code
To find objects within a 70 cm radius of the user, I send signals from an ultrasonic sensor and measure how long they travel. From there, I convert it into centimeters with the microsecondsToCentimeters() function. The vibrating motor, buzzer, and led then flicker on and off in response; the frequency of the pulsing increases as the object got closer.
  void loop()
  {
    long duration, cm; //Variables for wave duration and wave distance
    digitalWrite(pingTrigPin, LOW); //Confirming that the trigPin is clear
    delayMicroseconds(2);
    digitalWrite(pingTrigPin, HIGH); //Generating a wave by setting trigPin to HIGH for 5 microseconds and then back to low
    delayMicroseconds(5);
    digitalWrite(pingTrigPin, LOW);
    duration = pulseIn(pingEchoPin, HIGH); //Storing the travel time is variable duration
    cm = microsecondsToCentimeters(duration); //Converting to distance
    if(cm<=70 && cm>0) //Makes the light blink faster when the distance is smaller --> starts blinking at 70cm
    {
      int d= map(cm, 1, 100, 20, 2000); //d stores a variable that reformats a range
      digitalWrite(buz, HIGH); //Turning light on for .1 second
      delay(100);
      digitalWrite(buz, LOW); //Turning light off
      delay(d); //Waiting for a time that corresponds to the variable cm
    }
  }
Schematics

Anvika. 2023 Object Detection Schematic [Tinkercad Circuit Diagram].
Bill of Materials
Prices as of August 2023| Part | Quantity | Note | Unit Price | Link |
|---|---|---|---|---|
| Arduino Micro | 1 | Microcontroller | $24.90 | Arduino |
| Ultrasonic Sensor | 1 | Object Detection | $3.95 | Digikey |
| Vibrating Motor | 1 | Haptic Feedback | $1.90 | DigiKey |
| Buzzer | 1 | Auditive Feedback | $.70 | Amazon |
| 5mm Red LED | 1 | Visual Troubleshooting | $0.45 | SparkFun |
| Slide Switch | 1 | Selecting Haptic of Auditive Feedback | $0.27 | Amazon |
| 220Ω Resistor | 1 | Limiting Current to LED | $0.44 | McMaster-Carr |
| Breadboard | 1 | Intial Circuit Base | $4.95 | Adafruit |
| Male-to-Female Jumper Wires | 1 | Connecting Wires | $2.10 | DigiKey |
| Breadboard Jumper Wires | 1 | Connecting Wires | $11.99 | Amazon |
Text-to-Speech Conversion
The first modification I implemented started from the idea of a text-to-braille translator. I planned to use Raspberry Pi OpenCV to read text and then have an Arduino Micro convert it onto a homemade braille display. However, the idea of this display opened a Pandora’s box of technical challenges. The display had to be small enough to be portable and lightweight, but I couldn’t sacrifice the amount of text translated at a time. While researching I found professors at the University of Michigan who were developing technology that would be perfect for this project.
Michigan Engineering Microfluidics Braille Tablets
The Braille tablets are a huge step in the right direction for assistive technology but I decided I wanted to focus on a modification someone could more readily recreate at home. So instead, I repurposed the vibrating motor from the object detection to convert text into Morse code.
Code for Morse Code Translator
To translate the text, I modified a program created by Arduino Education. The section below shows how the program deciphers which letter to translate into Morse code. It starts by receiving the user-entered text character by character and then decides whether it is a lowercase or uppercase letter, number, or space. From there, the appropriate Morse code sequence is outputted by pulsing the vibrating motor.
void loop()
{
  char ch;
  if (Serial.available())
  {
    ch = Serial.read(); // read a single letter if (ch >= 'a' && ch <= 'z')
    Serial.print(ch);
    if (ch >= 'a' && ch <= 'z')
    {
      flashSequence(letters[ch - 'a']);
    }
    else if (ch >= 'A' && ch <= 'Z')
    {
      flashSequence(letters[ch - 'A']);
    }
    else if (ch >= '0' && ch <= '9')
    {
      flashSequence(numbers[ch - '0']);
    }
    else if (ch == ' ')
    {
      delay(dotDelay * 4);
    }
  }
}
Later, I realized that Morse code, like Braille, is not an accessible method of communication; as a matter of fact, only 1% of the population can understand Morse code. So, to complete this milestone, I decided to shift gears to a text-to-speech translator and control it entirely with a Raspberry Pi.
Unlike the Arduino Micro, a simple microcontroller, the Raspberry Pi is a full-fledged computer with the processing power to convert live text into speech. I used a small Pi camera with a meter-long ribbon cable and earbuds with a headphone jack.
The first step was connecting my Pi to my computer remotely. I encountered a setback when my computer had trouble connecting to my Pi through a VNC Server and lagged noticeably when I would SSH into it. After days of troubleshooting, I decided to reflash my Pi’s SD card and connect through a monitor.
Once I established a strong connection to the Pi, I started working on live text recognition using Python. I soon faced the issue of dealing with blurry photos that the Pi was unable to read. By manually adjusting the focus of the camera and going through several rounds of testing, I successfully converted text into speech.
For the software portion of the converter, I used the PiTextReader software developed by Russell Grokett.
Bill of Materials
Prices as of August 2023| Part | Quantity | Note | Unit Price | Link |
|---|---|---|---|---|
| Raspberry Pi 4 Model B (2 GB) | 1 | Computer | $45.00 | SparkFun |
| Micro HDMI to HDMI Cable | 1 | Raspberry Pi-to-Monitor Connection | $4.95 | CanaKit |
| SanDisk 32GB Class 10 MicroSD Card | 1 | Recommended SanDisk Raspberry Pi Class 10 MicroSD Cards | $11.95 | CanaKit |
| USB Card Reader Dongle | 1 | Dongle for Writing Card | $2.95 | PiShop |
| Raspberry Pi 15W Power Supply | 1 | USB-C Power Adapter Only Compatible with Raspberry Pi 4B. | $8.00 | PiShop |
| Dell Wireless Keyboard and Mouse | 1 | Controlling Raspberry Pi with Monitor | $22.99 | Dell |
| Raspberry Pi Camera Module V2 | 1 | Camera | $25.00 | SparkFun |
| Flex Cable for Raspberry Pi Camera or Display - 1 meter | 1 | Cable to Connect Camera and Raspberry Pi | $3.95 | Adafruit |
| Earbuds | 1 | Speech | $9.04 | Amazon |
Jacket Integration
Before attaching the two systems to the jacket, I made a circuit diagram on Tinkercad with the object detection adapted for two ultrasonic sensors, buzzers, and vibrating motors:
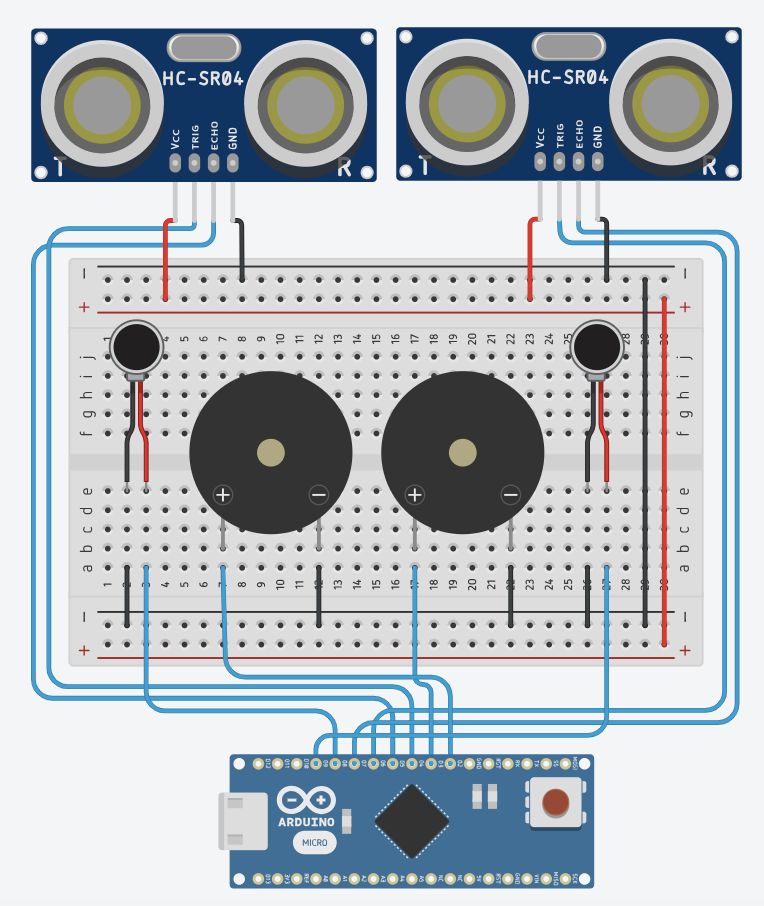
Anvika. 2023 Adapted Object Detection Schematic [Tinkercad Circuit Diagram].
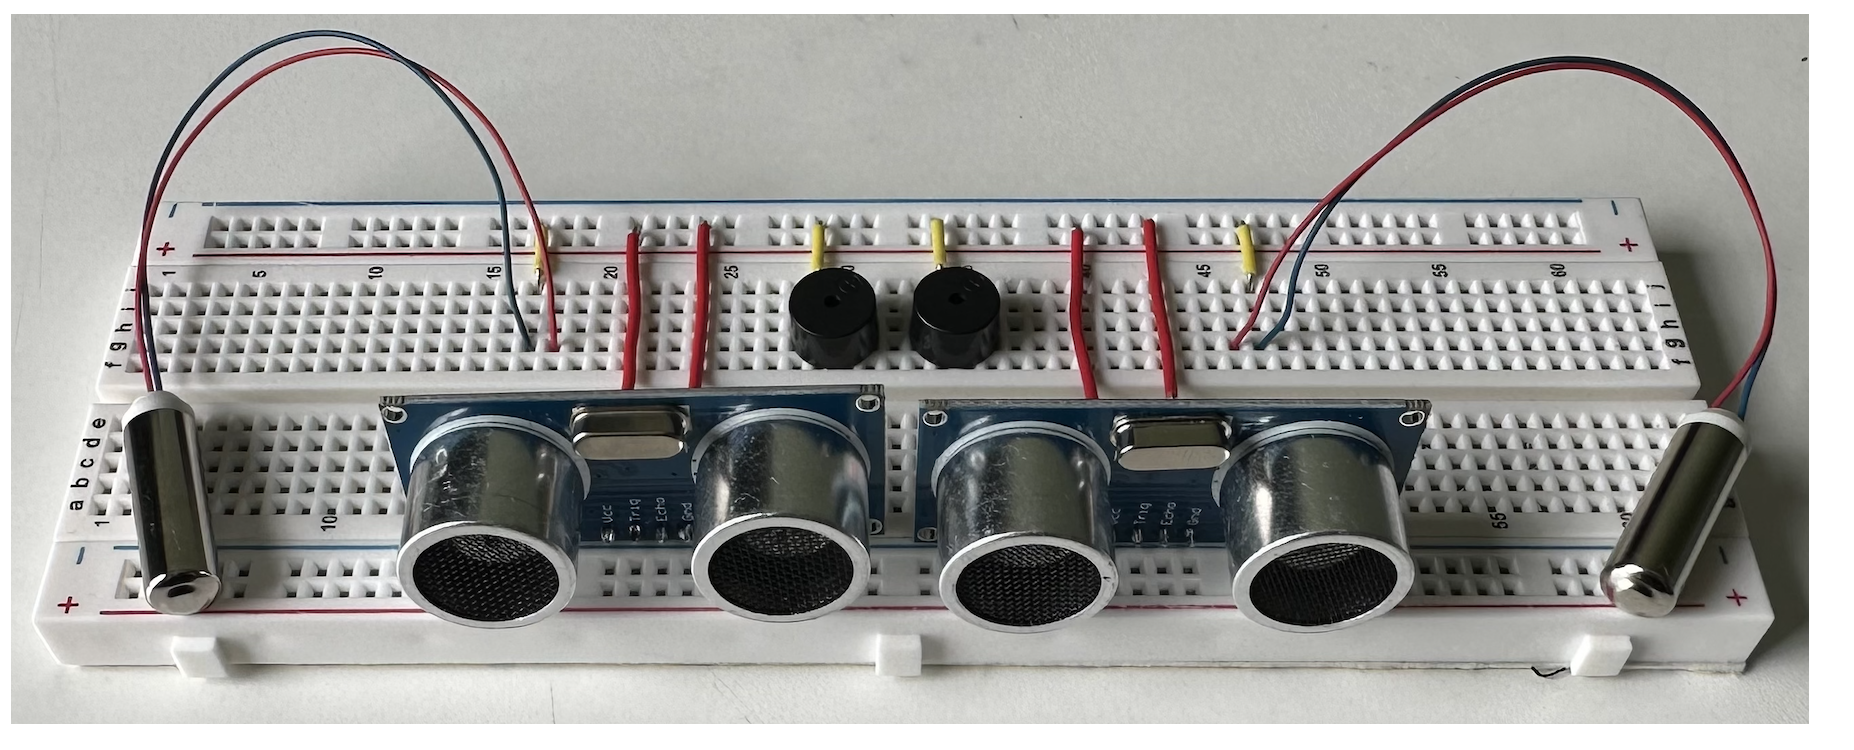
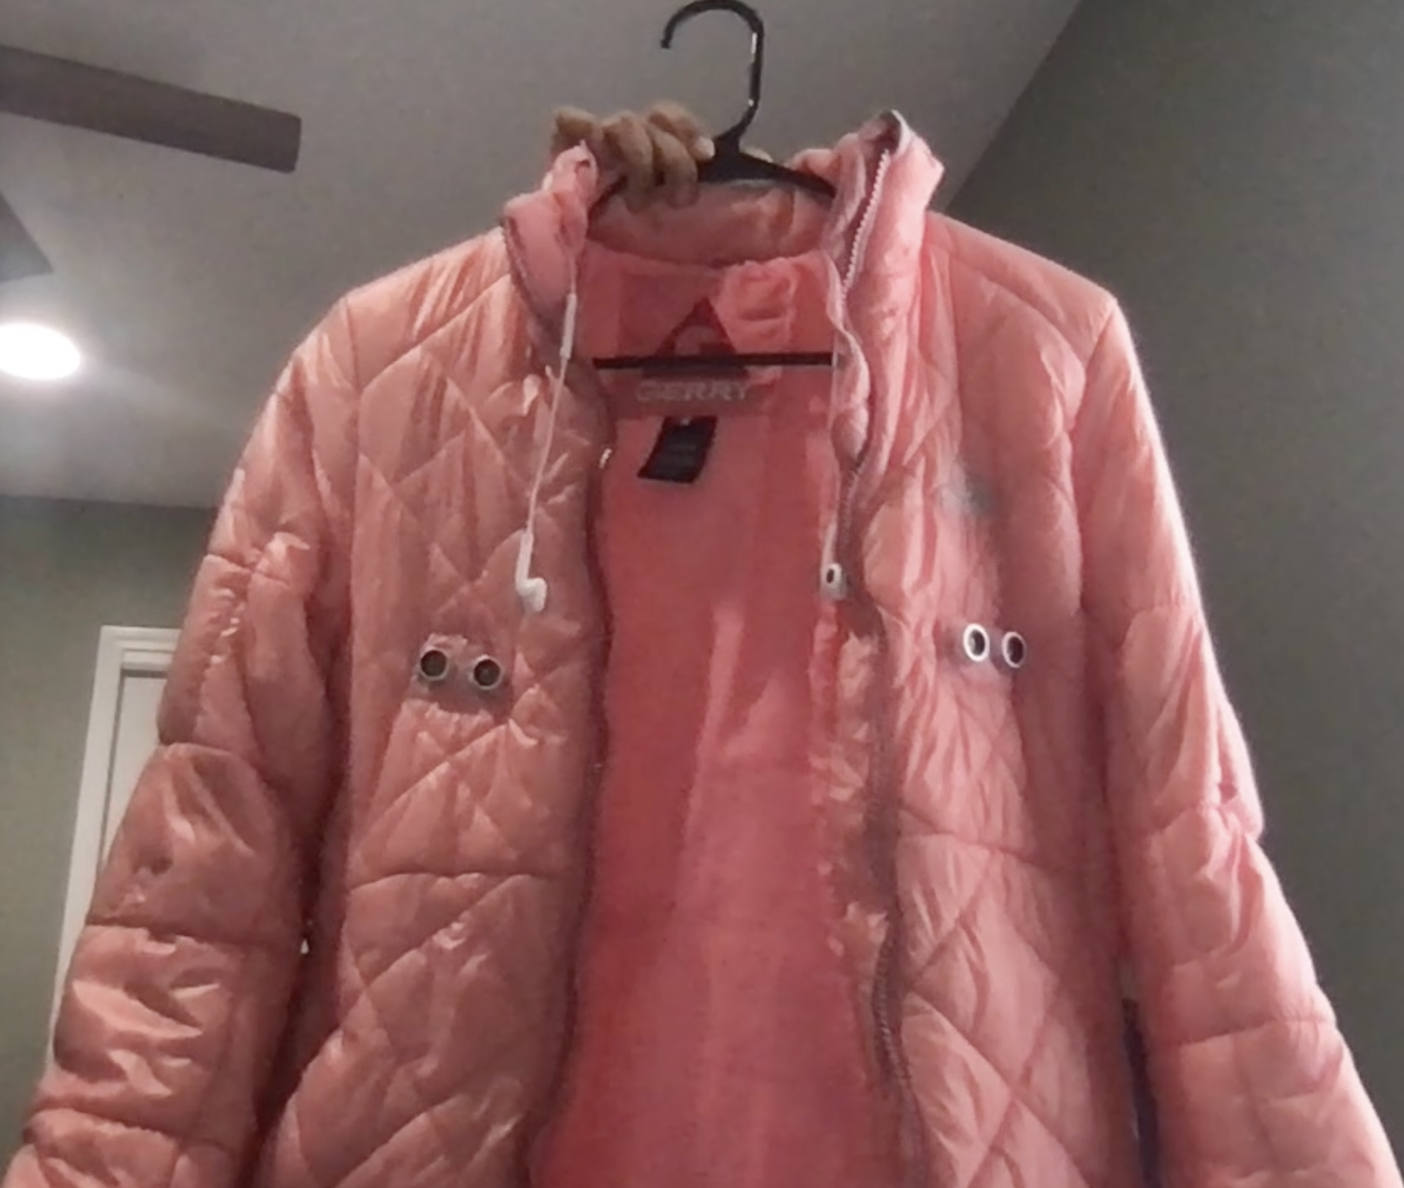
Anvika. 2023 Adapted Object Detection Breadboard [Photograph].
The final step before stitching the electronics onto the jacket was powering the object detection with a battery pack:
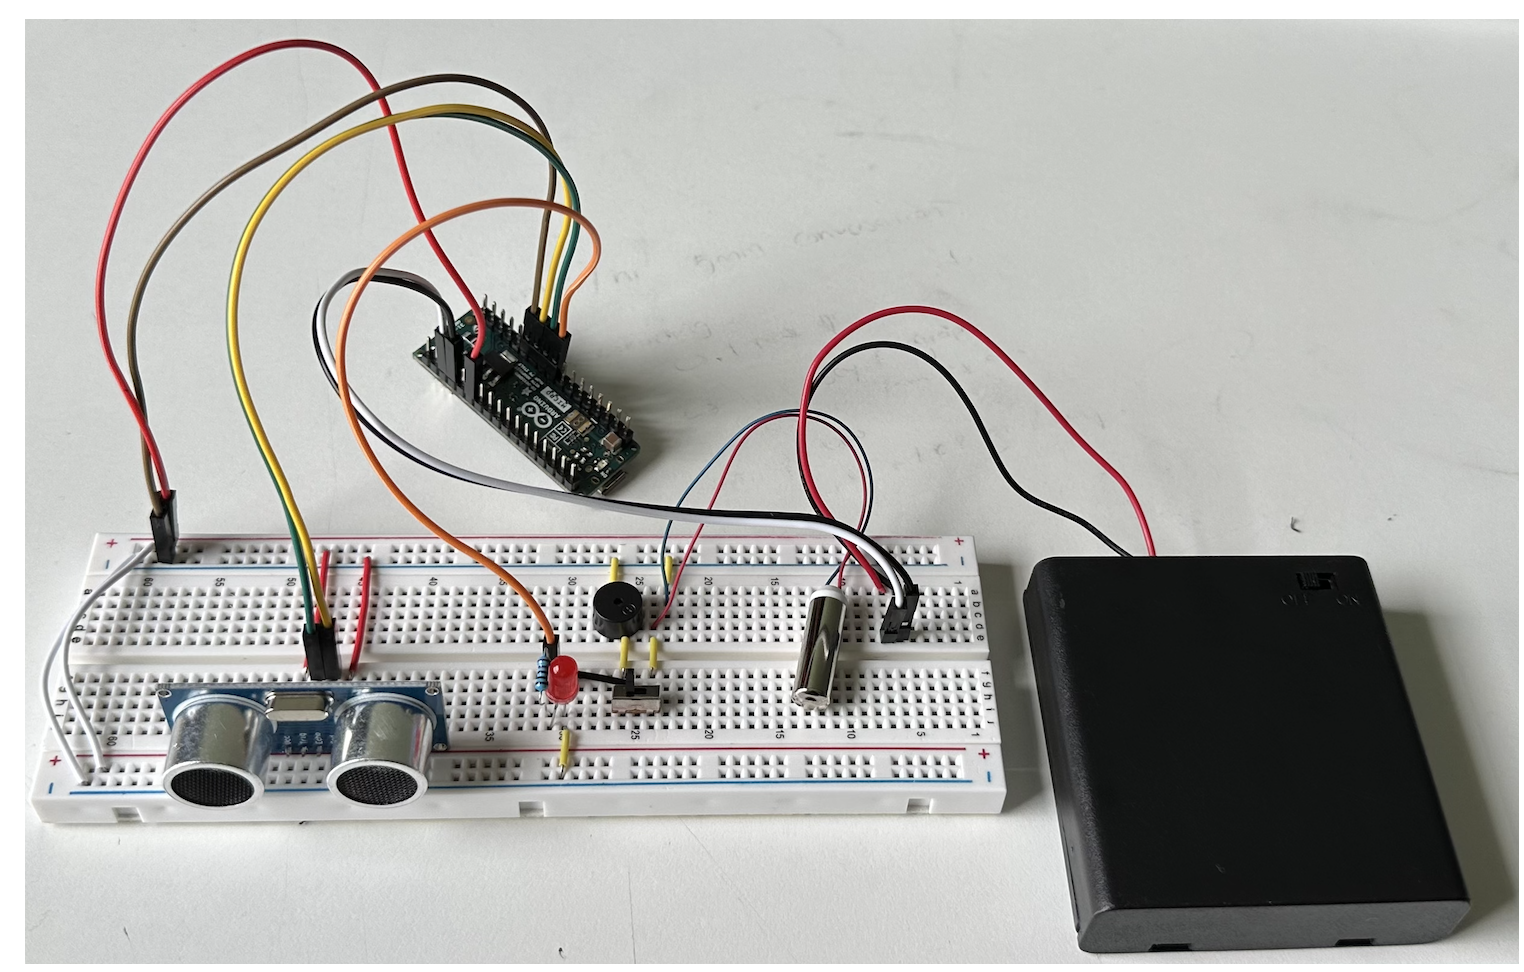
Anvika. 2023 Object Detection with Battery [Photograph].
To start incorporating the various sensors, I followed a sketched jacket layout and roughly placed the components. I repurposed an old jacket, but if I were to improve on this project, I would find a waterproof garment with a breathable fabric to avoid electronics overheating.
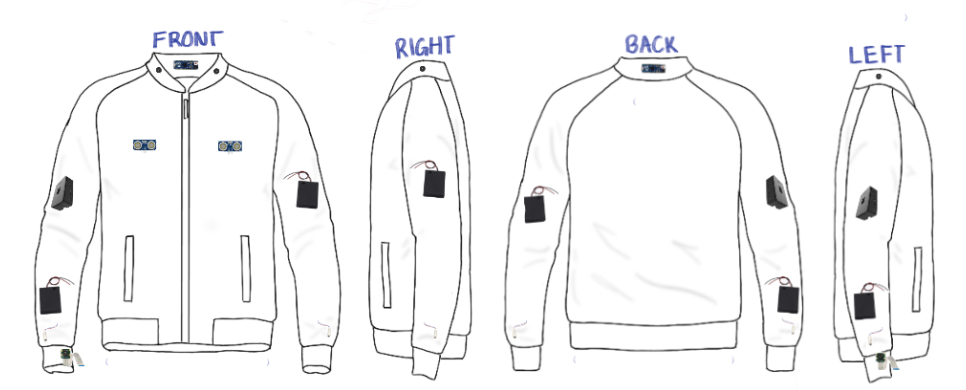
Anvika. 2023 Sketched Jacket Layout [Digital Drawing].
Anvika. 2023 Jacket Layout [Digital Drawing].
Final Bill of Materials
Prices as of August 2023| Part | Quantity | Note | Unit Price | Link |
|---|---|---|---|---|
| Jacket | 1 | Project Base | ||
| Arduino Micro | 1 | Microcontroller | $24.90 | Arduino |
| Ultrasonic Sensor | 2 | Object Detection | $3.95 | Digikey |
| Vibrating Motor | 2 | Haptic Feedback | $1.90 | DigiKey |
| Buzzer | 2 | Auditive Feedback | $.70 | Amazon |
| 6V Battery Holder with Switch | 1 | Object Detection Power Supply | $3.75 | Amazon |
| Raspberry Pi 4 Model B (2 GB) | 1 | Computer | $45.00 | SparkFun |
| SanDisk 32GB Class 10 MicroSD Card | 1 | Recommended SanDisk Raspberry Pi Class 10 MicroSD Cards | $11.95 | CanaKit |
| Raspberry Pi Camera Module V2 | 1 | Camera | $25.00 | SparkFun |
| Flex Cable for Raspberry Pi Camera or Display - 1 meter | 1 | Cable to Connect Camera and Raspberry Pi | $3.95 | Adafruit |
| Earbuds | 1 | Speech | $9.04 | Amazon |
| Battery Pack for Raspberry Pi | 1 | Text-to-Speech Translator Power Supply | $25.95 | Amazon |
| 22 Gauge Silicone Solid Core Wire | 1 | Flexible Connections | $18.99 | Amazon |